
Nowadays media processing knowledge is becoming kind of necessity no matter if you are media streaming "professional" or just an ordinary developer wanting to do minor manipulations of media files making them more appropriate for your platform and project requirements.
The most common use cases are:
- I want to extract audio track from some media file container,
- I want to transcode video and/or audio track (change encoding format) so that I can play it in web browser,
- I want to change resolution (width/height) and FPS (frames per second) of some video file,
- I want to convert (transmux) one media file container to another (e.g. from MP4 to MPEG TS)
- I want to stream my movie to another PC in local network
I'll try to pass on my knowledge by sharing few media processing examples using open source Gstreamer media framework.
Basics
Media file containers (e.g. mp4, avi, matroska, mpeg ts,...) are just wrappers gluing together video, audio and other tracks and containing meta data information about tracks. So in order to manipulate elementary tracks we need to know how to execute basic operations
- demultiplex (extract) video/audio tracks from file container,
- decode video/audio in raw format so that we can apply some post-processing (changing resolution or FPS),
- encode video/audio raw format to required encoding format,
- multiplex video/audio to required file container
Gstreamer can handle and process media files using variety of components (elements) that can be found in Gstreamer plugins. Components can be interconnected forming pipeline where data usually flows upstream (from source to sink, from "left to right"). Actually every Gstreamer element has at least one of its own sinks (where data comes in) and/or sources (where data comes out).
In general, elements are connected like this
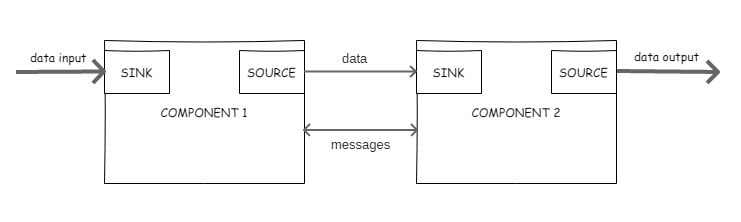 and are capable to exchange messages in to inform each other about some events happening during data processing (e.g. sync messages).
Details can be found here.
and are capable to exchange messages in to inform each other about some events happening during data processing (e.g. sync messages).
Details can be found here.
Official Gstreamer tutorials are quite extensive with many source code examples of Gstreamer API usage. In this story we will focus on command line examples not requiring knowledge of C programming language. So don't be afraid and continue reading :)
One sink -> multiple sources
Some Gstreamer elements can have one sink and multiple sources. For example, qtdemux element accepts MP4 file (containing video and audio track) and exposes video source and audio source for other upstream elements.
Multiple sinks->one source
Other Gstreamer elements can have several sinks and one source. For example, mpegtsmux accepts video and audio in separate sinks and produces MPEG Transport Stream (MPEG TS) exposing it as a source.
Inspect element capabilites
Gstreamer provides gst-inspect-1.0 utility to inspect and find out element capabilities. For example, following command line will give detailed information about capabilities of qtdemux element.
gst-inspect-1.0 qtdemux
Oops...Do you have Gstreamer installed on this machine? :) If not, you can stop reading for a moment to install Gstreamer and download sample media file that will be used in following examples.
Installation on Ubuntu
Gstreamer is part of official Ubuntu repository and can be installed using Ubuntu's standard package manager.
sudo apt-get install libgstreamer1.0-0 gstreamer1.0-plugins-base gstreamer1.0-plugins-good gstreamer1.0-plugins-bad gstreamer1.0-plugins-ugly gstreamer1.0-libav gstreamer1.0-doc gstreamer1.0-tools
Downloading sample media file
Open source 3D creation software Blender provides proof-of-concept "Big Buck Bunny" video.

You can download from here and save it as fat_bunny.ogg. By doing this you will "kill 2 flies with one strike":
- you can continue reading this article doing exercises and learning more about Gstreamer and media processing,
- and in the same time you will entertain your children so that you can actually do exercises if you work from home like I do :)
Media file container content
Media file container usually (but not necessarily) contains both video and audio tracks (elementary streams). Lets discover what our Fat Bunny hides inside his belly. For that purpose we will use Gstreamer's gst-discovery-1.0 application. Go to directory where you downloaded sample movie and execute command line
gst-discoverer-1.0 fat_bunny.ogg
You will get following output containing information about inner streams
Analyzing file://home/dule/Videos/fat_bunny.ogg
Done discovering file://home/dule/Videos/fat_bunny.ogg

Topology:
  container: Ogg
    audio: Vorbis
    video: Theora

Properties:
  Duration: 0:09:56.458333333
  Seekable: yes
  Tags:
      encoder: Xiph.Org libVorbis I 20070622
      encoder version: 0
      audio codec: Vorbis
      nominal bitrate: 192000
      bitrate: 192000
      container format: Ogg
      video codec: Theora
To learn even more add -v option to previous command
gst-discoverer-1.0 -v fat_bunny.ogg
Reading the output you will see that movie is packed in Ogg file container and that it has
- one video stream encoded in Theora video codec with WxH=1280x720 and 24 frames per second
- one audio audio encoded in Vorbis audio codec with bitrate=192 kilo bits per second (Kb/s)
Now we know more about our bunny and we play around with it.
Play media file
Playing media file with Gstreamer is quite simple. Just execute following command line
gst-play-1.0 fat_bunny.ogg
and Gstreamer will automatically recognize video/audio codecs playing movie in separate window.
Easy? Well we are just warming up for next things to come...
Extract audio from media file
To extract audio from our movie we will need to learn more about how Gstreamer forms a pipeline for media processing.
In this example we will use following Gstremaer elements
- filesrc for reading file at
location, - oggdemux for demultiplexing video and audio from ogg file container making those elementary streams available for further processing (decoding),
- vorbisdec decoder for decoding vorbis codec audio into raw audio format,
- avenc_ac3 encoder for encoding raw audio format into widely supported Dolby's AC3 audio codec.
This is how command looks like
gst-launch-1.0 -v filesrc location=fat_bunny.ogg ! oggdemux ! vorbisdec ! avenc_ac3 bitrate=64000 ! filesink location=bunny_audio.ac3
Execute it and, after it's finished, new file is created containing only audio track. It can be played with
gst-play-1.0 bunny_audio.ac3
or with any audio player of your preference.
Note that we've also used encoder's property
bitrate=64000to decrease audio bitrate from original 192Kb/s to 64Kb/s in order to reduce output file size (and unfortunately lower down quality).
To create audio encoded in AAC format (supported by modern web browsers),
avenc_aacshould be used instead ofavenc_ac3
Extract video from media file
Pipeline will be very similar as previous one with difference that we need to use video decoder and video encoder. Following command line will extract Theora video from file and transcode it to H264 video format (supported by modern web browsers)
gst-launch-1.0 -v filesrc location=fat_bunny.ogg ! oggdemux ! theoradec ! x264enc ! filesink location=bunny_video.h264
Convert to some other container format
Although ogg container format and Vorbis and Theora codecs are open and free, in certain scenarios reality bites and we are forced to use some other file container for video and audio. So...in order to dress our bunny in different fur and to repack our movie in different media container, we need to introduce new Gstreamer elements and learn advanced techniques.
Following command line repacks ogg file container to mp4 file container
gst-launch-1.0 filesrc location=fat_bunny.ogg ! oggdemux name=demux \
qtmux name=mux ! filesink location=fat_bunny.mp4 \
 demux. ! theoradec ! x264enc ! mux. \
 demux. ! queue max-size-time=5000000000 max-size-buffers=10000 ! vorbisdec ! avenc_aac compliance=-2 ! mux.
Run it and after it's done (it will take a while), get media info about fat_bunny.mp4 using gst-discoverer-1.0 fat_bunny.mp4
Examine the output and notice that we've done succesfull repacking by altering video to H264 format, audio to AAC format and container type to MP4.
It can be played in any modern video player as well as in modern web browsers.
How did we actually do it?
The easiest way to view and understand pipeline from previous command is to represent it by following graph
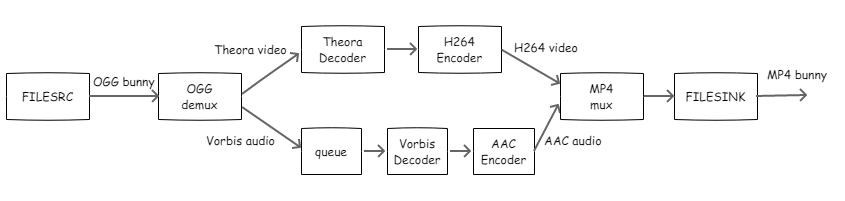 As you can see, we introduced 2 new Gstreamer elements:
- queue to buffer incomming data and create separate thread so that video and audio branch can execute in paralel.
- mp4mux for multiplexing/packing together video and audio into MP4 container
Gstreamer has inbuilt feature to export any running pipeline as graph. In case of our example it looks like this

Stream movie to remote machine
We've done it all just fine but what if our machine does not have monitor? How can we watch our repacked bunny?
In that case we need to stream it over network to some other machine like this
gst-launch-1.0 filesrc location=fat_bunny.ogg ! oggdemux name=demux \
mpegtsmux name=mux alignment=7 ! udpsink host=192.168.1.5 port=5000 buffer-size=10000000 \
 demux. ! theoradec ! x264enc ! mux. \
 demux. ! queue max-size-time=5000000000 max-size-buffers=10000 ! vorbisdec ! avenc_aac compliance=-2 ! mux.
where
- mpegtsmux repacks video and audio into MPEG transport stream
- udpsink sends MPEG TS to remote machine via UDP protocol. In our example remote machine's location is defined with
host=192.168.1.5 port=5000
On remote machine MPEG transport stream can be watched, for example, using VLC player.
Just start VLC, goto menu Media->Open network stream..., in URL field type udp://@0.0.0.0:5000, press Play and enjoy.